April 30, 2012 has been named as the date for new web video closed caption rules. These rules apply to videos shown on television and then made available online.
One deadline has already passed. September 30 was the deadline for captioning new video, shown on television, and then shown on the internet video without being edited.
March 30, 2013 requires live or near live television that is posted online within 24 hours to be captioned. In about a year, on September 30, 2013, prerecorded video that was edited for the Internet must be captioned.
Eventually, the rules will apply for video that was not new as of April 30, 2012. By March 30, 2016, all video that was shown on television with captions must be captioned within 15 days of it being shown online.
As I posted on my Hearing Sparks blog, Amazon.com has already begun captioning some of its Instant Video titles in response.
There's more information and more specific dates at this NAD page.
How to make your websites, videos, images, and other media accessible for those who need it - from someone who knows.
Saturday, October 6, 2012
Monday, October 1, 2012
How To Easily Caption or Subtitle Your YouTube Videos
Captions for online video is something that is very important to me, because I and thousands of other people around the world really need them. When I sit down to watch a video that is primarily of someone talking, I have to work hard to understand them, even if they may be perfectly clear with crisp audio. Captioning your videos means I can enjoy them, and that I'll probably watch them to the end.
Captioning a video makes it accessible to everyone, and also provides marketing and a useful reference tool. But how easy is it to provide captions for the videos you upload to YouTube?
YouTube provides a spot for you to upload your captions file, but making a file like this can seem tricky and daunting at first. The file looks like this:
Using an online tool like Amara (formerly Universal Subtitles) makes the task of creating a file like this easy. There are other online tools out there, but this tutorial is Amara-specific because I found it very easy and simple to use.
Note: Click on any of the images in this tutorial to enlarge them for easier viewing.
1. Upload Your Video
Upload your video to YouTube. The video needs to be either public or unlisted. Amara won't be able to access a private video to caption it. I suggest making your video unlisted until you get the captions done, then make it public.
2. Plug the URL Into Amara
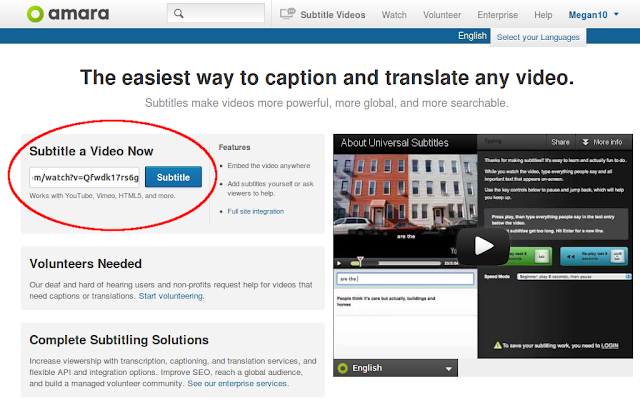
Copy and paste the URL of your video into the appropriate box on Amara's homepage. You don't need to create an account.
3. Type Out Your Captions
On this screen, the video will play in 4-second increments. Type the audio you hear, then hit the Tab key to play the next 4 seconds. Split your text up as you go. This takes a little bit of getting used to, but you can go back and forward as much as you need, as well as delete or edit sections of text you have already written.
4. Time Your Captions
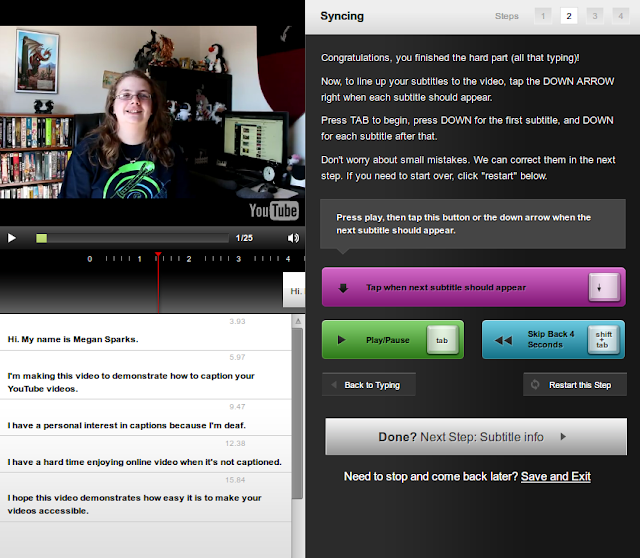
Next you'll need to time your captions to the video. This can seem tricky at first, but it's easy and you can take as long as you need. Just hit the down arrow key as a new line begins. Amara will figure out the timing for you.
5. Add a Title and Description
This will be a title and description for the subtitle file you just created.
6. Get the Subtitles
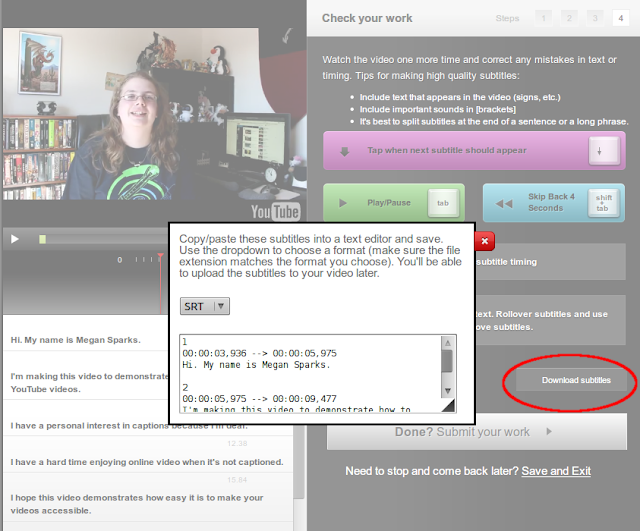
On this page, click on "Download subtitles". Copy and paste the text you see into a text editor and save it with the .srt extension, which YouTube can recognize.
You can also create an account from this page in order to save your subtitles and work on other videos.
7. Upload the File to YouTube
On your video page, click on the white arrow to access the Captions option.
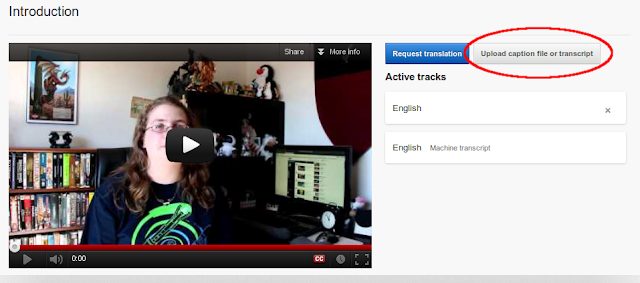
From the page that comes up, click "Upload caption file or transcript." Find your .srt file and select it.
8. You're Done!
Congratulations! You can view the captions on your video by clicking on the "CC" button in the player.
Thank you for making your videos accessible for the deaf and hard of hearing!
If you'd like to see the video I used for this tutorial, you can view it below. I intend to use this video to eventually make a full video tutorial on using captions on YouTube.
Captioning a video makes it accessible to everyone, and also provides marketing and a useful reference tool. But how easy is it to provide captions for the videos you upload to YouTube?
YouTube provides a spot for you to upload your captions file, but making a file like this can seem tricky and daunting at first. The file looks like this:
1This file tells the video player where to start and stop a line of captions.
00:00:03,990 --> 00:00:05,594
Hi. My name is Megan Sparks.
2
00:00:05,594 --> 00:00:08,940
I'm making this video to demonstrate how to caption your YouTube videos.
3
00:00:08,940 --> 00:00:11,799
I have a personal interest in captions because I'm deaf.
Using an online tool like Amara (formerly Universal Subtitles) makes the task of creating a file like this easy. There are other online tools out there, but this tutorial is Amara-specific because I found it very easy and simple to use.
Note: Click on any of the images in this tutorial to enlarge them for easier viewing.
1. Upload Your Video
Upload your video to YouTube. The video needs to be either public or unlisted. Amara won't be able to access a private video to caption it. I suggest making your video unlisted until you get the captions done, then make it public.
2. Plug the URL Into Amara
Copy and paste the URL of your video into the appropriate box on Amara's homepage. You don't need to create an account.
3. Type Out Your Captions
On this screen, the video will play in 4-second increments. Type the audio you hear, then hit the Tab key to play the next 4 seconds. Split your text up as you go. This takes a little bit of getting used to, but you can go back and forward as much as you need, as well as delete or edit sections of text you have already written.
4. Time Your Captions
Next you'll need to time your captions to the video. This can seem tricky at first, but it's easy and you can take as long as you need. Just hit the down arrow key as a new line begins. Amara will figure out the timing for you.
5. Add a Title and Description
This will be a title and description for the subtitle file you just created.
6. Get the Subtitles
On this page, click on "Download subtitles". Copy and paste the text you see into a text editor and save it with the .srt extension, which YouTube can recognize.
You can also create an account from this page in order to save your subtitles and work on other videos.
7. Upload the File to YouTube
On your video page, click on the white arrow to access the Captions option.
From the page that comes up, click "Upload caption file or transcript." Find your .srt file and select it.
8. You're Done!
Congratulations! You can view the captions on your video by clicking on the "CC" button in the player.
Thank you for making your videos accessible for the deaf and hard of hearing!
If you'd like to see the video I used for this tutorial, you can view it below. I intend to use this video to eventually make a full video tutorial on using captions on YouTube.
Saturday, September 29, 2012
Exploring the Digital Nation: Computer and Internet Use at Home
Exploring the Digital Nation: Computer and Internet Use at Home (PDF link) is a fascinating 2011 study by the U.S. Department of Commerce. It's a definite must-read if you're marketing yourself online, to be aware of the number of people who may not have access to what you're sharing.
In the report, it's noted that 43% of people with disabilities have broadband access at home, compared to 72% of the general population. When the factors were controlled for demographic variables such as income and education the gap dropped to a slightly more welcome 6%.
According to the report, the reasons cited for not having broadband access at home were:
| A computer lab, via Flickr user GWSA. |
According to the report, the reasons cited for not having broadband access at home were:
- Lack of need or interest (47%)
- Lack of affordability (24%)
- Inadequate computer (15%)
Friday, September 28, 2012
Using Google Hangouts? Add Live Captions
If you use Google Hangouts for marketing, or to increase communication with your website viewers, consider adding live captions to your stream. Google announced this service earlier this year at the National Association of the Deaf conference.
While in a Hangout, you have the option to provide live captions yourself or go through a professional service, StreamText. Before using either, you'll need to install the app.
Besides making a Hangout accessible for your deaf or hard of hearing audience, a captioned transcript can be very useful to refer to after the fact.
As I wrote in my other blog in June, I'd still love to see the addition of automated captions (such as those Google already uses on YouTube videos) to Google+ Hangouts, but this is definitely a step in the right direction.
While in a Hangout, you have the option to provide live captions yourself or go through a professional service, StreamText. Before using either, you'll need to install the app.
 |
| An example of Google+ Hangout captions, via Google. |
Besides making a Hangout accessible for your deaf or hard of hearing audience, a captioned transcript can be very useful to refer to after the fact.
As I wrote in my other blog in June, I'd still love to see the addition of automated captions (such as those Google already uses on YouTube videos) to Google+ Hangouts, but this is definitely a step in the right direction.
Monday, September 24, 2012
3 Reasons to Caption Your Videos
1. Accessibility
Of course, this is the #1 reason why video should be captioned or subtitled* online. If you are trying to get a message out to a large audience, you should make sure everyone in your audience can see your message.
2. Marketing Value
The text of captions or subtitles becomes a reference text for the web - basically, Google and other search engines search all text on the web, and that includes captions. Your caption text file will have marketing value for you because it will enable Google and other search engines to point people who are searching for you in the right direction. A video with no captions can only be indexed by search engines via the title, tags, and description. Check out this Business 2 Community article for more information.
3. Ease of Reference
Captioning your videos means you can easily find them later, and you can pinpoint exactly what you're trying to find within a video without playing it all the way through. The Daily Show uses closed caption files to hunt down specific clips they want to use on the show, according to this article on User Interface Engineering.
* The difference between captioning and subtitled can be subtle and some people use them interchangeably while others differentiate. In general, a captioned video means that text will display all sounds that occur on screen, and words exactly as they are spoken. Subtitles will often subtitle only the spoken word and may also be translated into other languages.
Wednesday, September 19, 2012
Google Adds Accessibility Features in Apps
Google has added some accessibility features to Google Apps. Check out more information on the official Google blog at this link: Google Official Blog
There's a good rundown of the new features on their official Google Group at this link: Google Groups
Some of the improvements they've added include Optical Character Recognition for PDFs and images (allowing screen readers to read them), custom colors for Google Calendar, improved keyboard accessibility, and button consistency.
Labels:
accessibility,
colors,
google,
keyboard,
OCR,
screen readers
Wednesday, September 12, 2012
How to Add Alt Text to Images in Blogger
Click on any of the images in this post to view them at original size.
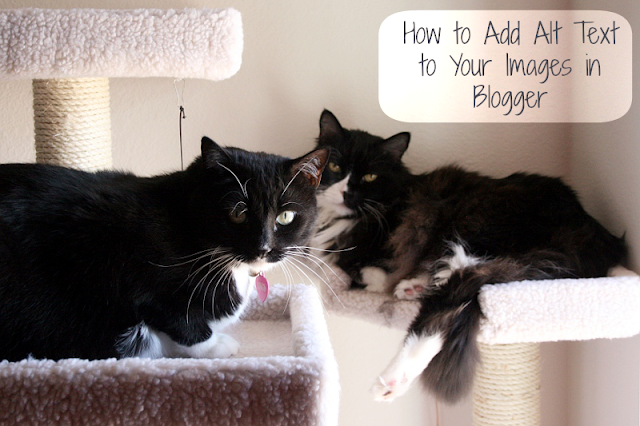
The "alt" tag in HTML refers to the "alternate text" for an image, used in case the image cannot be displayed. The image below contains alt text.
In order to view alt text in a normal browser, such as Firefox, Internet Explorer or Google Chrome, you can typically either hover over it or right-click to see the properties of the image. (In Firefox, the alt text on an image will show up under "View Image Info."
For someone using a screen reader, which is a software program that reads webpages aloud to someone with sight difficulties, the alt text of an image will be read. If there is no alt text the image will be skipped.
In order to add alt text to an image in Blogger, first add your image to your blog post as normal, or edit a post containing images. Next, click on the image while you are in the editing screen. You will see several options pop up under your cursor.
While it may appear that you should click "Caption," you should actually click "Properties." Clicking "Caption" will allow you to add text visible under the image, and while this would be read by a screen reader, it might not be clear that the caption belongs to an image.
Clicking "Properties," you will see this dialog box:
I would suggest typing the same text into both boxes so that your description can serve as both the title text of the image and the alt text. Then click "OK" and you are finished.
You can also edit the alt text by going into Blogger's HTML editing mode. Inside of the image tag, add "alt=your text here," like so:
The American Foundation for the Blind has several suggestions on their website for how to write effective alt text.
Alt text will also show up when using Pinterest to pin from websites, which makes it doubly useful.
The "alt" tag in HTML refers to the "alternate text" for an image, used in case the image cannot be displayed. The image below contains alt text.
In order to view alt text in a normal browser, such as Firefox, Internet Explorer or Google Chrome, you can typically either hover over it or right-click to see the properties of the image. (In Firefox, the alt text on an image will show up under "View Image Info."
For someone using a screen reader, which is a software program that reads webpages aloud to someone with sight difficulties, the alt text of an image will be read. If there is no alt text the image will be skipped.
In order to add alt text to an image in Blogger, first add your image to your blog post as normal, or edit a post containing images. Next, click on the image while you are in the editing screen. You will see several options pop up under your cursor.
While it may appear that you should click "Caption," you should actually click "Properties." Clicking "Caption" will allow you to add text visible under the image, and while this would be read by a screen reader, it might not be clear that the caption belongs to an image.
Clicking "Properties," you will see this dialog box:
I would suggest typing the same text into both boxes so that your description can serve as both the title text of the image and the alt text. Then click "OK" and you are finished.
You can also edit the alt text by going into Blogger's HTML editing mode. Inside of the image tag, add "alt=your text here," like so:
<img src="mycats.png" alt="My cats, Isis and Sneakers">The Blogger-generated code may look more complicated than this, but that's all there is to it.
The American Foundation for the Blind has several suggestions on their website for how to write effective alt text.
Alt text will also show up when using Pinterest to pin from websites, which makes it doubly useful.
Wednesday, September 5, 2012
Welcome to Accessibility Basics
Welcome to Accessibility Basics. This website is a
project intended to assist Web content creators and programmers with
information on how to make their websites, videos, images, and other
media accessible for those who need it online.
This website will provide examples, statistics, research data and other information to help you help others experience the content you create to its fullest.
A Little About Me
My name is Megan Sparks and I created this website as a project for my TWC 421 - Principles of Writing with Technology class. I'm currently attending Arizona State University for a bachelor's degree in Technical Communication.
I am profoundly deaf and have worn hearing aids since I was four years old. I created the blog Hearing Sparks in 2009 in order to share information about hearing loss and my experiences. I work fulltime at a public library in Arizona, and part of my job duties include assisting with ADA accessibility and communicating via social media on behalf of the library.
I hope that you find this website useful in helping others!
Subscribe to:
Comments (Atom)

